

I have set up a page on Facebook where I will be showcasing all of my recipes, focusing in particular on cakes and macarons.
I have loads of exciting upcoming projects and experiments in mind so search for Baked By Sarah
Thank you 🙂
I have set up a page on Facebook where I will be showcasing all of my recipes, focusing in particular on cakes and macarons.
I have loads of exciting upcoming projects and experiments in mind so search for Baked By Sarah
Thank you 🙂

Tips to creating the perfect finish to an iced cake;

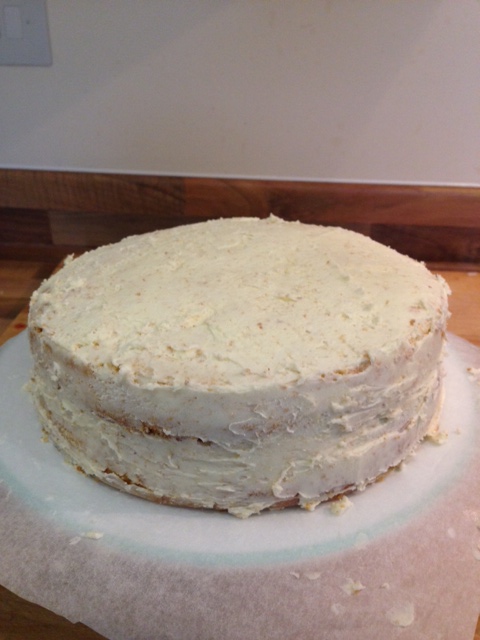
I’m making my friend’s wedding cake for her in a couple of months’ time. This is the first (of many I hope) that I have aver made and am hoping that this is something which I can become really good at.
As I have never made one before I thought it was about time I started practising.
To begin with I decided to keep it simple so I started with an easy vanilla sponge which is a fool proof recipe for any type of cupcake or sponge. I made 2 separate cakes in a round cake tin and layered them on top of each other using vanilla buttercream and raspberry jam.
This is also the first time I have attempted to do both a crumb coat and a full cake covering with rolled out icing.
I really want to master this and feel confident as I will probably fall in to panic mode in the run up to the wedding!
Ingredients
These are the ingredients for one sponge cake as I made one at a time (I only had one round cake tin) so you will want to double these measurements up so you can make 2!
Sponge
125g Caster Sugar
125g Unsalted Butter (at room temperature)
2 Medium Eggs whisked
125g Self Raising Flour (sifted)
2tbsp Semi Skimmed Milk
1tsp Vanilla Essence
Buttercream
250g Icing Sugar (sifted)
55g Unsalted Butter
30ml Semi Skimmed Milk
1tsp Vanilla Essence
Additional
1tbsp Raspberry Jam
Ready to Roll Icing
Method
1. To make the sponge whisk together the caster sugar and the butter until creamy
2. Slowly whisk in the eggs, adding a spoonful of the flour to prevent the mixture from curdling
3. Fold in the remaining flour with a metal spoon and then mix in the milk and vanilla extract
4. Line an 8 inch round tin with greaseproof baking paper. Add the mixture and pop into a preheated oven of 180 degrees (fan) for 18/20 minutes, or until an inserted toothpick comes out clean
5. Let the cake cool before sliding off onto a wire rack to cool further
6. Repeat this process so you have 2 cakes
7. To make the buttercream, whisk together the sifted icing sugar and butter and then slowly add the milk and vanilla extract
8. Even out the top of each of the cakes by thinly slicing off a thin layer with a sharp knife
9. On top of the one cake used a pallet knife to smooth over a thin layer of the buttercream and then smooth the jam on top of the buttercream
10. Balance the other cake on top ensuring that they are even
11. Apply a crumb coat to the entire cake and then refrigerate for around 30 minutes
12. Roll out the icing and use your rolling pin to apply the icing to the cake
13. Smooth down the edges and cut off any excess icing with a sharp knife
14. Garnish with some sliced strawberries


I made this cake as an experiment as I fancied buying a giant cupcake mould. The result was so nice and my friends were so impressed that one of them asked if I could make it for her for her engagement party.
I made the cake and was so pleased I managed to complete it as I am rubbish with timing and left myself no time to spare so I was literally icing this cake right up until the last minute.
On the night of the engagement party one of my friends came over for some pre-drinks and it suddenly dawned upon me that I had not factored in how I was going to transport the cake to the venue, I hadn’t even thought about boxing it up.
At this time I was actually living close to the city centre so I was only a 5 minute walk away from the venue so my friend and I decided to brave it and just go for it, we put the cake on to a baking tray and I walked through the centre of town carrying a giant cupcake on a baking tray. (luckily I had a couple of gin and tonics inside me) It was definitely a talking point and a good memory of which I share with this cake.
The cake itself is red velvet. This is not my usual choice of cake as it does involve quite a high volume of food colouring however, it tied in nicely in with the red theme and I considered it as a gift, therefore, a treat!
Usually you would see a red velvet cake with a cream cheese frosting which can be quite difficult to pipe due to its consistency. Buttercream is much more versatile and will help to create the beautiful roses which you see here.
Tip
It may be helpful to grease the inside of the cake tins with a light coating of oil or some butter to help release the cakes from the tins
Ingredients
125g of softened unsalted butter at room temperature
325g caster sugar
2 eggs
25g cocoa powder (I like Bournville)
1tsp vanilla extract
1 x 38ml red food colouring
325g plain flour
1tsp salt
1 tsp bicarbonate of soda
1 x 284ml carton of buttermilk
1 tbsp vinegar
4 tbsp raspberry jam
Buttercream
500g icing sugar
115g unsalted butter at room temperature
60ml milk
1tsp vanilla essence
Method
1.Beat the butter and sugar until light and fluffy. Whisk the eggs together in a small bowl and gradually add to the sugar mixture
2. In a separate bowl, mix together the cocoa powder, vanilla and food colouring and then beat this into the sugar mixture ensuring it is all combined
3. Sift the flour, salt and bicarbonate of soda into a bowl and add this into the mixture in intervals. Alternate the intervals with the buttermilk to prevent the mixture from curdling
4. Divide the mixture into the 2 cake pans (the top and bottom sections of the cake)
5. Bake in a pre-heated oven at 180 degrees (fan oven) for approximately 45 minutes, until an inserted skewer into the centre comes out clean.
6. Allow the cakes to cool fully in the tins before turning them out onto a rack.
7. Level off the bottom half of the cake base and spread the raspberry jam on top. Add the top layer and the jam should help them to stick together
8. To finish off I then made a batch of my vanilla buttercream, inserted it into a piping bag and using a star shaped nozzle began to pipe roses across the base. Start from the bottom and work your way upwards
9. I then made some edible roses to complete the cake
