

I have set up a page on Facebook where I will be showcasing all of my recipes, focusing in particular on cakes and macarons.
I have loads of exciting upcoming projects and experiments in mind so search for Baked By Sarah
Thank you 🙂
I have set up a page on Facebook where I will be showcasing all of my recipes, focusing in particular on cakes and macarons.
I have loads of exciting upcoming projects and experiments in mind so search for Baked By Sarah
Thank you 🙂
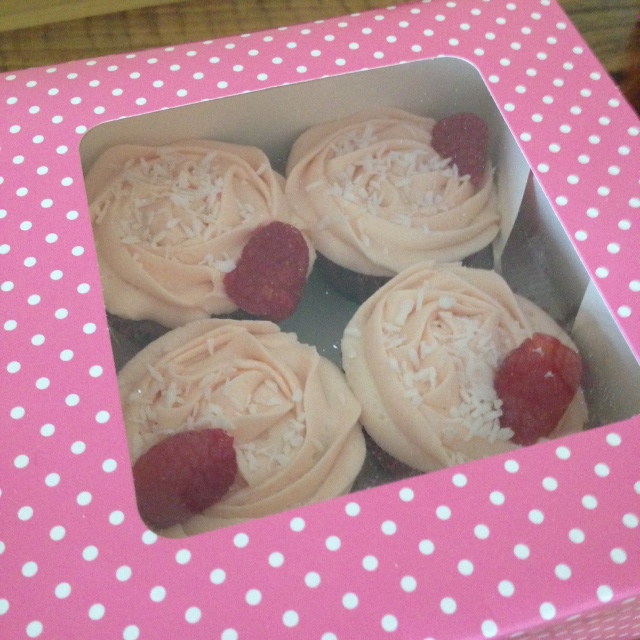
I made these cakes as a Mother’s Day treat as my mum loves coconut and these are a bit different from your regular cupcake. They also combine two of my favourites techniques – a flavoured centre filling and rose piped icing.
These involve a few more ingredients that your regular cupcake as I added raspberries into the batter so it’s important to ensure that the consistency of the batter is maintained to create a fluffy, light sponge.
With summer only around the corner it’s nice to incorporate nice fresh raspberries into the recipe. I am going to start experimenting with other varieties of fruit in upcoming recipes.
Ingredients
115g Golden Caster Sugar
115g Unsalted Butter
110g Self Raising Flour
15g Cornflour
1/2 Teaspoon Baking Powder
2 large Eggs (free-range or organic)
125g Crushed Fresh Raspberries
Raspberry Jam
Icing
115g Unsalted Butter (at room temperature)
60ml coconut Milk
1tsp Vanilla Extract
500g Icing Sugar (sifted)
Food Colouring of your choice
Desiccated Coconut
Method
This method is really simple, the key with this recipe is using the correct measurement of ingredients and gradually combining the ingredients to prevent curdling.
1. Using a hand whisk cream the butter and sugar together
2. Add the eggs one by one and continue to whisk, adding a small measure of the flour each time to prevent the mixture from curdling
3. Sift all of the remaining ingredients together and add to the mixture, whisking thoroughly
4. Fold in the crushed raspberries
5. Pre-heat the oven to 180 degrees, line a muffin tray with muffin cases and fill roughly 3/4 of the way
6. Bake for approximately 20 minutes until an inserted tooth pick comes out clean
7. Allow to cool for a few minutes in the baking tray before turning out on to a wire rack to cool fully
8. In the meantime, prepare the icing
9. Beat together the butter, coconut milk, vanilla essence and half of the icing sugar
10. Gradually add the remainder of the icing sugar and food colouring of your choice – I chose a few drops of bright pink gel
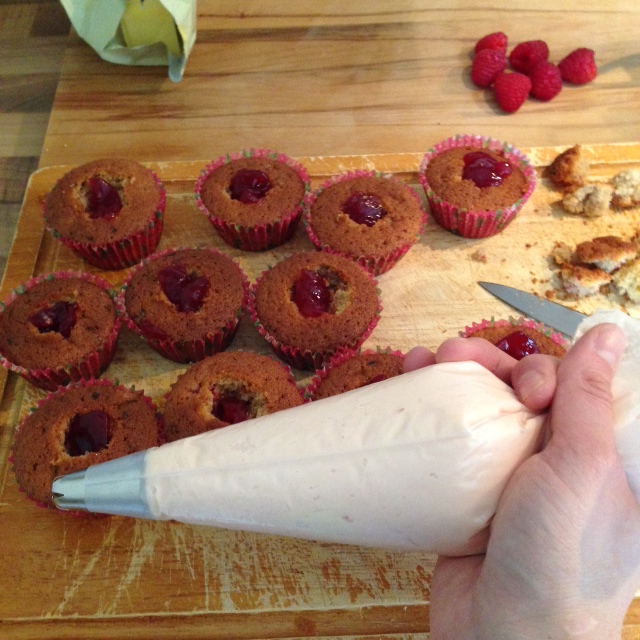
11. Cut out the centre of the cooled cupcakes and spoon in a small amount of raspberry jam
12. Pipe the icing sugar on top of the cake
13. Finish off by decorating with some raspberries and a sprinkle of the desiccated coconut 🙂


I made this cake as an experiment as I fancied buying a giant cupcake mould. The result was so nice and my friends were so impressed that one of them asked if I could make it for her for her engagement party.
I made the cake and was so pleased I managed to complete it as I am rubbish with timing and left myself no time to spare so I was literally icing this cake right up until the last minute.
On the night of the engagement party one of my friends came over for some pre-drinks and it suddenly dawned upon me that I had not factored in how I was going to transport the cake to the venue, I hadn’t even thought about boxing it up.
At this time I was actually living close to the city centre so I was only a 5 minute walk away from the venue so my friend and I decided to brave it and just go for it, we put the cake on to a baking tray and I walked through the centre of town carrying a giant cupcake on a baking tray. (luckily I had a couple of gin and tonics inside me) It was definitely a talking point and a good memory of which I share with this cake.
The cake itself is red velvet. This is not my usual choice of cake as it does involve quite a high volume of food colouring however, it tied in nicely in with the red theme and I considered it as a gift, therefore, a treat!
Usually you would see a red velvet cake with a cream cheese frosting which can be quite difficult to pipe due to its consistency. Buttercream is much more versatile and will help to create the beautiful roses which you see here.
Tip
It may be helpful to grease the inside of the cake tins with a light coating of oil or some butter to help release the cakes from the tins
Ingredients
125g of softened unsalted butter at room temperature
325g caster sugar
2 eggs
25g cocoa powder (I like Bournville)
1tsp vanilla extract
1 x 38ml red food colouring
325g plain flour
1tsp salt
1 tsp bicarbonate of soda
1 x 284ml carton of buttermilk
1 tbsp vinegar
4 tbsp raspberry jam
Buttercream
500g icing sugar
115g unsalted butter at room temperature
60ml milk
1tsp vanilla essence
Method
1.Beat the butter and sugar until light and fluffy. Whisk the eggs together in a small bowl and gradually add to the sugar mixture
2. In a separate bowl, mix together the cocoa powder, vanilla and food colouring and then beat this into the sugar mixture ensuring it is all combined
3. Sift the flour, salt and bicarbonate of soda into a bowl and add this into the mixture in intervals. Alternate the intervals with the buttermilk to prevent the mixture from curdling
4. Divide the mixture into the 2 cake pans (the top and bottom sections of the cake)
5. Bake in a pre-heated oven at 180 degrees (fan oven) for approximately 45 minutes, until an inserted skewer into the centre comes out clean.
6. Allow the cakes to cool fully in the tins before turning them out onto a rack.
7. Level off the bottom half of the cake base and spread the raspberry jam on top. Add the top layer and the jam should help them to stick together
8. To finish off I then made a batch of my vanilla buttercream, inserted it into a piping bag and using a star shaped nozzle began to pipe roses across the base. Start from the bottom and work your way upwards
9. I then made some edible roses to complete the cake


This has to be one of the most simplest yet tastiest cupcake to whip up for any chocolate lover.
My friend just gave birth to a beautiful baby girl so with a quick, last minute visit planned for us girls to get in there to see the baby asap I was nominated as “cupcake bringer”. Usually I would have tried my best to make something that resembled the fact that we were welcoming a baby however, I decided to play it safe and go for a fool proof recipe which the girls would love.
Ingredients
For the Cake;
125g Unsalted Butter (at room temperature)
125g Caster Sugar
2 Medium Free Range Eggs (whisked)
125g Self Raising Flour (sifted)
1tbsp Bournville Drinking Chocolate Powder (sifted)
1tbsp Skimmed Milk (an attempt to lower the calorie intake)
1tsp Vanilla Essence
For the Buttercream;
115g Unsalted Butter (at room temperature)
500g Icing Sugar (sifted)
1tbsp Bournville Drinking Chocolate (sifted)
60ml Skimmed Milk
1tsp Vanilla Essence
Nutella
Method
Step 1
Whisk together the caster sugar and butter until they become fluffy (an electric whisk is best – i’ve had the same one for about 4 years)
Step 2
Gradually whisk in the eggs adding a spoonful of the flour to prevent the mixture curdling
Step 3
Fold in the remaining flour and Bournville powder and then mix in the milk and vanilla essence
Step 4
Fill your muffin cases 2/3 of the way in pop into a preheated oven at 180 degrees for 15-20 minutes
Step 5
Once the cakes have cooked, allow them to cool in the tin for approximately 10 minutes before transferring to a cooling rack
Step 6
Once cooled, dig out the centre of the cupcake and fill with Nutella
I usually make my buttercream whilst the cakes are in the oven to save a bit of time. To do so;
Whisk up the butter and add half of the icing sugar. At this point I like to add the milk and vanilla, this helps limit the mess caused from the icing sugar (bits of dust usually get everywhere) gradually add the remaining icing sugar and you will be left with a lovely vanilla/chocolate buttercream with the perfect consistency for piping.
I like to complete my cupcakes with my signature rose effect finish which can be easily achieved with a Wilton 2D Nozzle


